Convert (rip) DVD movies to iPod
Would you like to be able to watch your favorite DVD movies on your iPod? This tutorial will explain how to convert DVD video to a format you can upload to your iPod.
There are many video conversion tools that are capable of converting DVD video to iPod format. Many of them are general purpose toolkits that can convert almost any kind of video to almost any other format. Some of them are good tools, but they make the process a bit complicated.
Some conversion tools also perform the conversion in two stages. They rip the video to an uncompressed video (usually AVI format) and then convert the AVI video to the MP4 format used by your iPod. This takes twice as long, and also requires a lot more disk space, since the AVI file produced by the first stage of the conversion is much larger than the final output.
We recommend that you use Cucusoft DVD to iPod Converter. This tool has been specifically created to rip DVD videos to iPod format. It is easy to use and converts the video in a single pass, ready for upload to your iPod.
Step 1: Start the software
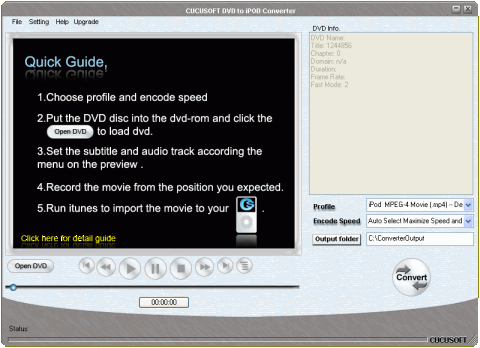
Start DVD to iPod Converter.

The software displays a Quick Guide, which shows how easy the conversion process is.
Step 2: Start the movie
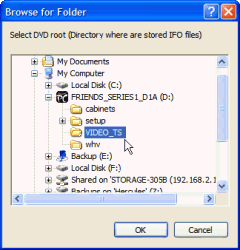
Load the DVD movie into your DVD player, then press and hold the Shift key. (This will stop Windows launching the default DVD player). When the disc is loaded, click Open DVD in DVD to iPod Converter. This will open a dialog box:

where you must specify where the DVD video files are stored. Usually, this is in a folder named VIDEO_TS in the root folder of the DVD. Select this folder and click OK. The video will start to play, and the software will fast forward it to the main menu.
Step 3: Select the content
Using the DVD menu, select what you want to record. You use the mouse to select items from the menu, just as you would when playing the movie on a DVD player. You can select subtitles, or a different language soundtrack, if you want. If the DVD contains several episodes of a TV series, you can select the episode you want to record.
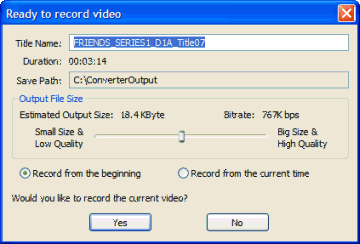
When you select an episode, or the start of the movie, it will start to play, just as it would when playing the movie on a DVD player. Click Convert. This will start the recording process, just like pressing the record button on a video recorder. A dialog box will appear:

You can use this dialog to change the name if you wish. This will only affect the filename of the converted video file, so you can change it later using Windows Explorer if you want.
Step 4: Start the recording
By default, DVD to iPod Converter will record from the beginning of the movie. The option Record from the beginning in the dialog box shown above will be checked. But you can also choose to record from the current time. This allows you to use the DVD fast forward and back controls to locate a part of the movie you would like to record, and then record and convert a clip.
Normally, you will just click Yes to record the whole movie. DVD to iPod Converter will skip back to the start of the movie (in case you missed a few seconds) and then start to record.
Depending on the speed of your computer, the video may be played faster than real time during the conversion. You will not hear any sound. If the conversion seems slow, then your computer is not very fast.
Step 5: Uploading the movie to your iPod
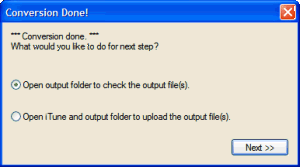
When the recording is finished, DVD to iPod Converter will display another dialog box. You will also see this dialog box if you stop the recording by clicking Abort.

Select one of the two options and click Next >>. DVD to iPod Converter will open the output folder in Windows Explorer, and you should see an MP4 file there, containing your converted video. If you chose the second option, DVD to iPod Converter will also have opened iTunes, ready for you to upload the DVD video to your iPod. It's that simple!
